Follow Me On Social Media!
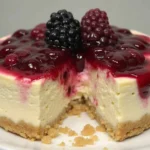
Mini Cheesecakes

When I think about comfort food, mini cheesecakes dance to the top of my list. These little gems are like having a bite-sized piece of happiness, perfect for any occasion or even just a cozy night at home. I remember the first time I made them; I was hosting a small get-together, and I wanted a dessert that felt special without taking the whole day to create. These mini cheesecakes came to my rescue, and I haven’t looked back since!
Why you’ll love this recipe
Let me tell you why you absolutely need to make these mini cheesecakes. First off, they’re ridiculously easy to whip up—even for kitchen novices—and yet they look incredibly fancy. Imagine serving up these adorable little cheesecakes at a dinner party, watching your friends’ eyes light up with delight. Just thinking about that moment makes my heart flutter!
Each mini cheesecake is creamy, rich, and perfectly balanced with just a hint of sweetness. And here’s the kicker: you can customize them however your heart desires! Top them with fresh fruits, a drizzle of chocolate, or even a sprinkle of nuts. The flavor possibilities are endless! Plus, they’re portion-controlled—ideal for those of us who are passionate about dessert but want to stay mindful.
Key ingredients overview
Let’s gather our star players, shall we? Here’s what you’ll need:
-
Cream Cheese (8 oz, softened): This is the heart and soul of our cheesecake. Opt for full-fat cream cheese for that signature creaminess. Low-fat versions just don’t have the same luscious texture. Let it sit out for a bit so it’s soft enough to beat into a smooth consistency.
-
Granulated Sugar (1/2 cup): Sugar isn’t just a sweetener; it brings balance to the tanginess of the cream cheese. You can also use alternatives like maple syrup or honey, but that might change the texture a bit.
-
Vanilla Extract (1 teaspoon): It’s the magic touch that transforms the flavor. Go for pure vanilla extract if you can—it’s worth it! Fake vanilla just doesn’t do justice to these little delights.
-
Large Eggs (2): They help set the cheesecake. Make sure to mix them in one at a time for a silky batter. You can replace them with flax eggs if you’re looking for a vegan option.
-
Sour Cream (1/2 cup): Sour cream adds a wonderful richness and depth of flavor. If you want a lighter option, Greek yogurt can step in nicely.
-
Graham Cracker Crumbs (1/2 cup): These will make up the crust, providing that delightful crunch. Don’t have graham crackers? That’s okay! You can use crushed cookies like Oreos for a different vibe.
-
Melted Butter (1/4 cup): This binds the crust together. If you’re going for a gluten-free version, melted coconut oil or a gluten-free cookie crust works beautifully!
-
Toppings of your choice: Fresh fruits, chocolate drizzles, whipped cream—the sky’s the limit!
Preparing Mini Cheesecakes
Now, let’s dive into the nitty-gritty of making these beauties. Grab your apron and let’s get started!
-
Preheat your oven to 325°F (163°C) so it’s nice and toasty when your cheesecakes are ready to go in.
-
In a mixing bowl, beat the softened cream cheese, granulated sugar, and vanilla extract together until the mixture is smooth and creamy. This is where the magic starts! You want it to be fluffy—so don’t rush.
-
Next, add in your eggs, one at a time, mixing gently after each addition. Patience is key here. We’re aiming for tender cheesecakes, not a soufflé!
-
Once those eggs are well incorporated, gently fold in the sour cream. Be careful—this is where you maintain that creamy texture. Just a few strokes and it’s done!
-
In a separate bowl, mix together the graham cracker crumbs and melted butter until they resemble wet sand. This will be your crust.
-
Line a muffin tin with cupcake liners, then take that crumb mixture and press it firmly into the bottom of each cup. Don’t be shy; give it some good pressure to hold it together.
-
Pour your cheesecake batter over the crust, filling each liner about two-thirds full. They’ll puff up a bit, but don’t worry, they’ll settle.
-
Bake these little treasures in your preheated oven for about 20-25 minutes or until they are set in the middle. A little jiggle is okay!
-
Once they’re done, let them cool at room temperature for a bit before transferring them to the fridge. Oh, let them chill for at least two hours—this is crucial for that perfect texture!
-
Before serving, go wild with your toppings. Fresh berries, a sprinkle of nuts, or a drizzle of chocolate are all fantastic choices.
Best way to enjoy it
When it comes to serving these mini cheesecakes, think about presentation. You might want to place them on a colorful platter, or even top them with a little extra whipped cream or a sprig of mint for that "wow" factor. Pair them with a cup of coffee or tea for a delightful afternoon treat, or serve them at dinner parties and be prepared for the compliments to roll in.
If you want to mix it up a bit, consider serving them alongside a scoop of vanilla ice cream or some homemade fruit compote for that extra layer of indulgence.
Storage and reheating tips
Now, let’s talk about storing any leftover mini cheesecakes (if you can manage to have any!). They store beautifully in the fridge, thanks to that rich cream cheese filling. Simply place them in an airtight container for up to 5 days. They also freeze remarkably well! Wrap them tightly in plastic wrap and pop them in the freezer for up to a month. When you’re ready to indulge, let them thaw in the fridge overnight.
Pro chef tips
Here are some little gems I’ve learned over the years to ensure your mini cheesecakes turn out perfect every time:
- Make sure your ingredients are at room temperature, especially the cream cheese and eggs. This helps avoid lumps in your batter.
- Don’t overmix after adding the eggs; just mix until combined. Overmixing can lead to cracks in your cheesecakes.
- If you notice some cracks after baking, don’t sweat it! A dollop of whipped cream or some fruit topping will cover that right up.
- For that perfectly silky top, you can run a small spatula around the edge of the cheesecakes right after they come out of the oven. This helps them release from the sides.
Creative Twists
Now, let’s get a little adventurous! Why not experiment with flavors or toppings? Here are some ideas:
- Add a tablespoon of lemon zest to the batter for a refreshing citrus twist.
- Swirl in some raspberry puree into the batter before baking for a fruity surprise.
- Try flavored extracts like almond or coconut instead of vanilla for different undertones.
- Instead of graham crackers, use crushed pretzels for a sweet and salty crust.
Ingredients
- 8 oz cream cheese, softened
- 1/2 cup granulated sugar
- 1 teaspoon vanilla extract
- 2 large eggs
- 1/2 cup sour cream
- 1/2 cup graham cracker crumbs
- 1/4 cup butter, melted
- Toppings of your choice: fresh fruits, chocolate drizzle, etc.
Directions to follow
- Preheat your oven to 325°F (163°C).
- Beat cream cheese, sugar, and vanilla until smooth.
- Add eggs, mixing one at a time.
- Fold in sour cream gently.
- Combine graham cracker crumbs with melted butter.
- Line muffin tin with cupcake liners, then press crumb mixture into each.
- Pour cheesecake batter into each cup, filling two-thirds full.
- Bake for 20-25 minutes until set.
- Cool at room temperature, then refrigerate for at least 2 hours.
- Top with your chosen toppings before serving.
Your questions answered
-
Can I make these mini cheesecakes in advance?
Absolutely! They’re perfect for prepping ahead; just make sure to store them properly in the fridge. -
How long do they last?
If stored in an airtight container, they’ll stay fresh for 5 days in the fridge, or up to a month in the freezer. -
What can I use instead of graham crackers?
You could use crushed Oreos for a chocolate version or even nut-based crusts for a gluten-free option. -
Can I skip the sour cream?
You can substitute with Greek yogurt, but it will slightly alter the taste and texture. -
Do I need to use muffin liners?
It’s recommended, as they help in easy removal and clean-up, but you can grease the tin well if you don’t have liners.
Everyone loves a delightful cheesecake, and these mini versions are just about the most fun you can have with a dessert. They’re perfectly sized bites of joy that are not just delicious but versatile as well—you can customize them endlessly! So don’t hesitate to give this recipe a whirl. I can’t wait to hear all about your mini cheesecake adventures! Share your experiences or any creative toppings you tried; after all, we’re all part of this delicious cooking community together! Happy baking!

Mini Cheesecakes
These mini cheesecakes are creamy, customizable, and perfect for any occasion, offering a bite-sized piece of happiness.
Ingredients
For the cheesecake filling
- 8 oz cream cheese, softened Opt for full-fat for the best texture.
- 1/2 cup granulated sugar Can substitute with alternatives like maple syrup.
- 1 teaspoon vanilla extract Use pure vanilla for better flavor.
- 2 large eggs Can replace with flax eggs for vegan option.
- 1/2 cup sour cream Greek yogurt can be used as a substitute.
For the crust
- 1/2 cup graham cracker crumbs Substitute with crushed cookies if preferred.
- 1/4 cup butter, melted Coconut oil can be used for a gluten-free option.
Toppings
- to taste fresh fruits, chocolate drizzle, etc. Customize as per preference.
Instructions
Preparation
- Preheat your oven to 325°F (163°C).
- In a mixing bowl, beat the softened cream cheese, granulated sugar, and vanilla extract together until smooth and creamy.
- Add the eggs one at a time, mixing gently after each addition.
- Gently fold in the sour cream.
- In a separate bowl, mix the graham cracker crumbs and melted butter.
- Line a muffin tin with cupcake liners and press the crumb mixture firmly into the bottom of each cup.
- Pour the cheesecake batter over the crust, filling each liner about two-thirds full.
Baking
- Bake for 20-25 minutes or until set in the middle.
- Let cool at room temperature before transferring to the fridge.
- Chill for at least 2 hours.
Serving
- Top with your choice of toppings before serving.
Notes
These mini cheesecakes store well in the fridge for up to 5 days or can be frozen for up to a month.